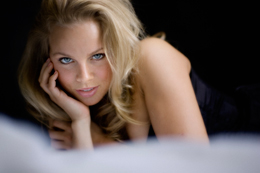
So I’m still testing the raw sun light look and Andi was nice enough to drop by the studio to help out. Andi did her own hair and makeup and she did a great job. She obviously paid attention to Tammy Pore during our first shoot together. This was Andi’s second shoot ever and she’s really catching on. I think the hardest thing for new models to do is keep the eyes small. I normally have to say “squeeze up the eyes” continually during a shoot for every new model.
Today I shot with my Profoto hardbox but I added my Elinchrom Octo camera left . I didn’t notice when I was shooting that I had a double shadow, bummer. I was just looking at her face and I liked what I saw so I decided to go with it. I wanted to keep the contrast in her cheekbones, but not too dark, thus the fill camera left. I should of kept the fill light straight on.
I had my HMI low shining up into her eyes to add more eye color.
The dress Andi is wearing is bright red and looks total stripper but I liked the graphic lines. She was limited to how she could move in the dress because the side cut outs are huge. The other problem is her arms are extremely tanned compared to the rest of her body (this is a fairly common problem). Making images black and white can really clear up a lot of problems. I find shooting color much much harder than black & white. I’m looking forward to doing more black and white, I haven’t found a work flow that I love just yet.

Hi,
(I wrote a comment yesterday… but it didn’t appear. I’ll try again…)
First of all, my congratulations for this picture. (in my opinion) a good balanced of strong elements: expression, pose and lighting.
You finished your entry asking “Got any B&W tips?”…
… I love B&W photography, since our film times (so long!). I work on digital with the same perspective applied when shooting B&W film, but with a far wider “palette” of alternatives.
When converting RGB to B&W, I apply coloured filters (in a similar way we did with film when shooting). Most of “convert to B&W” tools on medium-advanced retouching software do the job just fine; both alternatives: when workikng with RAW files or/and working with bitmap (prefered TIFF files at 16 bits).
Alternatively, specially for beauty/glamour/portrait, I work directly with the RGB files until finishing all the process (skin cleaning, brights fixed/balanced, etc.). Once that RGB file finished, i work with channels (mainly Red), combined with ColorLab conversion (to select lighting channel). The finished picture is a monochrome file (b&w) in RGB mode.
There are other alternatives I use for B&W photography, but the previous ones are quite usual in my workflow.
You can see some recent beauty/portrait B&W images, processed as refered (amongst other models’ photography) here in my website:
http://www.photomamp.com/pages/gallpe1.html
Congratulations for your blog!
Regards,
Miguel A. Muñoz
http://www.photomamp.com
@Dan – I’ve used Nik’s Silver Efex Pro, but was never impressed enough to bother with purchasing the separate product.
I was actually referring to the Black and White filter that came with their original Classic and Design filter collections (that’s two versions ago, I think). You can’t even purchase them anymore, and they don’t function in 64 bit Photoshop, only 32 bit.
I still prefer the old individual filters to the new UI, though–so I’ve never upgraded past the first version. (Besides–I only use Brilliance/Warmth; Black and White (sometimes); Contrast, and Lighten Center…and CS4’s Black and White filter (which I’ve built presets for) does pretty much what Nik’s old filter did–with more user control over the output.
Just clarifying, for anyone else who’s reading this! 🙂
Silver Efex Pro! Amazing and easy to use.
http://www.niksoftware.com/silverefexpro/usa/entry.php
Mary, have you used Nik Silver Efex Pro? (I think that is what Aurora is speaking of above)
It works well for me.
I’d never thought of black and white being a “fix” for the arm vs face problem! 🙂
The best tip I have for working with black and white is to create a small library of black and white (if you’re using CS4 or above) presets and curve presets for various skin colors–labeling them to indicate the skin color (ie, my “Emma” presets are for a warm, carmel colored African American skin; “Susan” is an orangey tan skin; “Shawndy”, fair, Irish skin with freckles and magenta undertones), and then use them as your “jumping off” point, when converting the image–while you’re still liable to tweak the presets, often, they’re spot on, and shave precious minutes off the editing.
(I used to use Nik’s Black and White conversion–it DOES do beautiful conversions–but I find it’s not as fast as my presets, these days.)
I also create actions that duplicate the red or green channels and copy them over onto the image in soft light or overlay mode, with the opacity dialed down to taste, before I convert to black and white, to increase the contrast. (Usually duping the green channel once, gives heightened contrast–then duping the green channel again, after the contrast change, gives a very nice high contrast effect–and, of course, you can mask out the effect on areas that need it–or bring in the red or blue channels, for local contrast adjustments.) THEN I use the presets, to do my BW conversion…
My pre-CS4 favorite way to do BW conversions (and a good way if you want to tone the whole image with one color or another), is to create an action that converts the image to LAB, select only the Lightness channel, and convert the image to greyscale..ctrl+click the grey channel, once it’s in greyscale, to select the light areas of the image, then inverse the selection; convert back to RGB (with the selection active), then add a color fill layer of your choice, set to soft light, over the image. It creates a very nice duotone effect–and takes seconds to run.
Oh–and if you work very often in BW, and find yourself using the same tools/actions/etc, repeatedly, then use the Adobe Configurator (free, from Adobe Labs) to create a custom panel with only the necessities on it…and load that with a BW workspace you create for yourself–then switch to that workspace, when you’re working in BW. I’m amazed at how helpful custom panels are for very prescribed workflows–and how much time they can shave off! (They’re less helpful for a more general retouching session–and can actually slow you down, I find.)
Hi,
Great image with a good balance (in my opinion at least), based on the “strong”: pose, expression and lighting.
You have finished your entry asking “Got any B&W tips?”… I really love B&W, since our film days (so long ! 🙂 … so let’s go:
I have found some ways shot B&W (converting RGB to B&W, I mean), similar to those days, which works really good for me… and with greater possibilities (far wider than then !) using the tools “convert to B&W” (as we did using coloured filters when working with film) plus channels, combined (the latter, mainly red channel and/or middle conversion to ColorLab). The final results are really useful for beauty, portrait, etc.).
You can find some examples thrugh this gallery (not only B&W, but some amongst the models gallery):
http://www.photomamp.com/pages/gallpe1.html
Congratulations for blog.
Keep up the good work!
Regards,
Miguel A. Muñoz
http://www.photomamp.com