I’m sure we all do quite a bit of web surfing. I stumbled upon a video by Joel Grimes on retouching. Running across articles and videos in the past, I’ve given some a try. The problem is, if you don’t keep track and you don’t use something often enough it just goes by the wayside, probably why actions are so popular.
I’ve done techniques in the past thinking, oh yeah, I’ll remember this. Very few techniques I’ve adapted into my everyday work flow. This work flow reminds me of a past technique, but with a couple of major twists. I decided to break it down and put it in a text document to file it away. In the past I’ve written it down on a desk top log, never to be seen again.
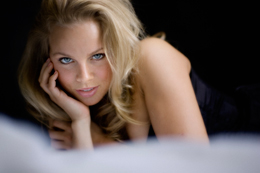
The final is above and the image below is after the first step in bridge (plus on the fill and minus on the clarity). I’m surprised by how the image looks after this step, kinda flat and thin looking. After the overlay step I dialed the opacity way down. This wasn’t an extraction but I did do the photo filter, again dialed way down. I really like the technique and think it has a lot of possibilities. Writing it in a text document should really help during my learning curve. The final is kinda on the yellow side but I want to force myself to get away from true representation, after all,it’s model photography not portraiture.
I added a bit more smoke to the image with cloud brushes you can find here.
BELOW IS A DUPLICATE OF MY TEXT DOCUMENT…I write it as if talking to myself
(I have a few things in bold, italic and underlined that the copy and paste didn’t pick up)
joel grimes PS technique
1. In bridge…
+plus fill and -minus clarity
hold shift down to open as smart object
2. Duplicate this by the following means, go up to…> Layer > Smart Object > New Smart Object via Smart Object Copy
Click on the layer ICON to open up…it takes you back into bridge
3. Open up HSL (Hue,Saturation,Luminance)> Convert to greyscale > minus the red and minus the orange to taste…press… OK
Set this layer to OVERLAY (this step is critical) in blending modes. MERGE VISIBLE OR FLATTEN
Dodges the midtones at 3 opacity
Photo Filter Yellow….this really makes the image change dramatically…I’ve put this before extractions, he does this as the very end technique…@ video 7.
The technique is great to here and doesn’t even need anything else. Continue if you want more HDR effect with high pass sharpening…
4. Duplicate Layer> Filter> High Pass> (he uses 4.0…way too generic for me…i would use a mask, unless the whole image can hold sharpening)
MERGE VISIBLE OR FLATTEN…SAME THING
he does his extractions